I created this cute crochet bunny peep with velvet yarn and a G hook. You can decorate with these adorable bunnies or give them as gifts. It measures 2 x 4 inches. I hope you enjoy this free Easter Bunny Crochet Pattern! In this video, we'll show you how to crochet a bunny step by step. This beginner's guide will teach you everything you need to know to crochet a bunny!
You'll learn how to create the basic stitches, and how to make the ears, the tail, and the feet. Once you've completed this crochet bunny tutorial, you'll have a beautiful new toy to play with!
Abbreviations
ch=chain
sl st=slip stitch
2sctog=2 single crochet together
sc=single crochet
I'm switching to a WordPress blog instead of using this Blogger platform for various reasons, so this pattern has been relocated.
These cute crochet bunny eggs are so cute for Easter! I used a F hook and medium worsted yarn. The crochet bunny egg measures 4 inches. This free crochet egg pattern turned out so cute! In this crochet Easter bunny tutorial, we'll show you how to make the most beautiful bunny ever! This bunny is perfect for Easter decorations, or even as a gift for someone special!
We'll teach crochet basics and then guide you through creating this beautiful bunny. We'll also provide tips and advice on how to make the best bunny ever! So be sure to watch our crochet Easter bunny tutorial now!
Abbreviations:
sc=single crochet
2sctog=2 single crochet together
sl st=slip stitch
ch=chain
I'm switching to a WordPress blog instead of using this Blogger platform for various reasons, so this pattern has been relocated.
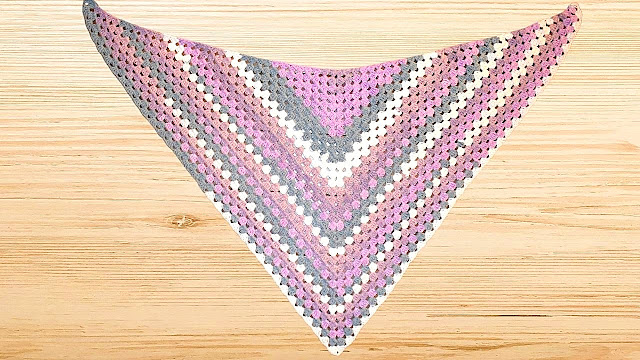
This crochet shawl is easy to make and great for beginners. The dimensions are 21.5 by 42 inches. I created this easy crochet shawl with an F hook and Caron Cotton Cakes yarn. This how-to-crochet scarf is so cute! If you're looking for a new and fashionable way to wear your hair, crochet women's shawls may be the answer! This tutorial will show you how easy it is to learn this popular fashion trend, and you'll be crocheting this shawl in no time!
I'm switching to a WordPress blog instead of using this Blogger platform for various reasons, so this pattern has been relocated.
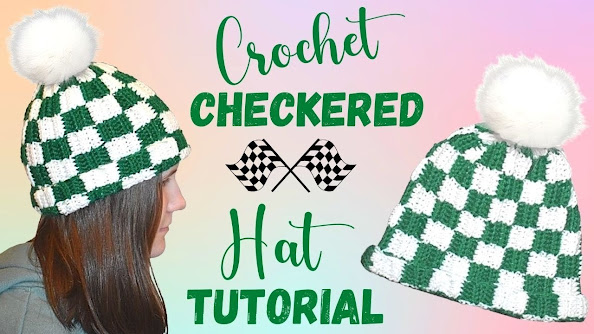
This crochet checkered hat was made with medium worsted yarn and an H hook. An H hook will make it tighter, which is best. You can make it bigger by adding more rows. This crochet hat is done in multiples of 5 plus 1. This easy crochet beanie for beginners turned out so cute! In this crochet plaid hat tutorial, we'll show you how to make a crochet plaid hat for beginners! This hat is made up of three different plaid designs, so it's perfect for anyone who wants to try a new crochet pattern!
If you're new to crochet, or you just want a fun project to work on, this crochet plaid hat is perfect for you! We'll show you how to crochet the hat in basic and advanced techniques, and then we'll show you how to add the finishing touches. So grab a yarn needle and a set of crochet hooks, and let's get started on this fun hat!
Abbreviations:
sc=single crochet
sl st=slip stitch
ch=chain
dc=double crochet
hdc=half double crochet
I'm switching to a WordPress blog instead of using this Blogger platform for various reasons, so this pattern has been relocated.
I created this adorable crochet bunny with medium worsted yarn and G hook. You can always make this bunny bigger with a larger hook and more rounds. This free easter bunny crochet pattern turned out so cute!
Learn how to crochet a bunny rabbit in this easy-to-follow guide. With this project, you'll be able to create a cute bunny rabbit that you can enjoy, and use in your crochet projects!
Crocheting a bunny rabbit is a fun and easy project that you can start today. In this guide, you'll learn how to crochet the rabbit's body, the ears, and the tail.
Abbreviations
Ch=chain
Sl st=slip stitch
Dc=double crochet
Sc=single crochet
2sctog=2 single crochet
together decrease, in the video I did 2 invisible sc together decrease
Rnd 1: G hook, Magic Circle, work
6 sc, sl st into the beginning sc
Rnd 2: 2 sc in each stitch
around, use a stitch marker- 12 sc
Rnd 3: *sc, 2sc in the
next stitch, *Repeat around, - 18 sc
Rnd 4: *sc in the
next two stitches, 2sc in the next stitch, *Repeat around, work in
continual rounds no slip stitch -24 sc
Rnd 5: *sc in the next
three stitches, 2sc in the next stitch, *Repeat around, -30 sc
Rnd 6: *sc in
the next four stitches, 2sc in the next stitch, *Repeat around, -36 sc
Rnds 7-12: sc in each
stitch around, - 36 sc (6 rounds of sc)
Rnd 13: *sc in the
next four stitches, 2sctog decrease in the next stitch, *Repeat around
Rnd 14: *sc in the next three
stitches, 2sctog decrease in the next stitch, *Repeat around
Rnd 15: *sc in the next two
stitches, 2sctog decrease in the next stitch, *Repeat around, start
stuffing the head with stuffing fiberfill. Place the Eyes into the head after
you fill it, about 7-8 rows down about 7 – 8 inches apart.
Rnd 16: *sc, 2sctog
decrease in the next stitch, *Repeat around, Make sure you have about 12
or so stitches when this round is finished.
The Neck, continue on.
Rnd 17: *sc in the
next two stitches, 2sc increase in the next stitch, *Repeat around
Rnd 18: *sc, 2sc in
the next stitch, *Repeat around,
rnd 19: *sc in the
next two stitches, 2sc in the next stitch, *Repeat around
Rnds 20-23: sc in
each stitch around for 4 rounds
Rnd 24: *sc in the
next two stitches, 2sctog decrease in the next stitch, *Repeat around,
Rnd 25: *sc in the
next sc, 2sctog decrease in the next stitch, *Repeat around
Rnd 26: sc in each
stitch around. Stuff with fiberfill
Rnd 27: *sc, 2sctog
decrease, *Repeat around
Rnd 28: 2sctog decrease,
until it closes, take your yarn needle and sew it up. Fasten off.
Legs, G hook, Make 2
Rnd 1: In the Magic
Circle, work 6 sc, sl st
Rnd 2: 2 sc in each stitch
around, use a stitch maker
Rnd 3: *sc, 2sc in the
next stitch, *Repeat around, work in continual rounds
Rnds 4-6: sc in each
stitch around, 3 rounds
Rnd 6: sc, 2sctog
decrease, stuff with filling fiberfill.
Rnd 7: 2sctog six times to
close, yarn needle and sew it closed. Fasten off. Sew both legs on the button
about 4 inches apart.
Arms, G hook, Make two
Rnd 1: In the Magic
Circle, work 4 sc, sl st
Rnd 2: *sc, 2sc, *Repeat
around
Rnd 3-4: sc in each stitch
around, two rounds, Fasten off
Sew them on both sides on
top of the body by the head.
Ears, Make 2
Rnd 1: In the Magic
Circle, work 5 sc, sl st
Rnd 2: 2 sc in each stitch
around,
Rnd 3: *sc, 2sc in the
next stitch, *Repeat around,
Rnd 4: sc in the next two stitches,
2sc, *Repeat around
Rnds 5-7: sc around, 3
Rounds total
Rnd 8: sc in the next two
stitches, 2sctog, *Repeat around
Rnds 9-10: sc around,
2 Rounds total
Rnd 10: sc, 2sctog,
*Repeat around, Fasten off and Sew on the Ears on top of the head about 3
inches apart.
Nose:
Sew on a nose below the
eyes in the center, with a some dash lines that look like a triangle.
Tail
In the Magic Circle, work
4 sc,
Rnd 2: sc, 2sc, Repeat
around, -6 sc or you can use a hot glue gun and attach a cotton ball on the
back.
Bow:
F hook
White yarn
In the Magic Circle, Ch 3,
work 3 dc, ch 3, sl st, ch 3, 3 dc, ch 3, sl st, sl st in the center to
complete pull in closed. Wrap the center with your yarn about 5-6 times. Sew on the bottom of one of the ears. I hope you enjoy this free easter bunny crochet pattern!
In this crochet bucket hat tutorial, you'll learn how to crochet a hat that's perfect for the fall season!
This hat is fun and easy to crochet, and it'll keep you warm and stylish all winter long. Watch the video tutorial and learn how to crochet a bucket hat in just a few easy steps!
Use this Chart above for the size you prefer, the pattern is found in the Crochet Hat's Book for Beginners. I love how this free bucket hat crochet pattern turned out!
For a Baby Hat instead of a D hook, Use a J hook and have less rounds;
Instructions: J hook
rnd 1. Start with White yarn, In Magic Circle, ch 3, 10 dc in ring, join with sl st. on top of ch 3. -11 sts.
rnd 2. ch 3, dc in same st. as joining, 2dc in each st. around. join with sl st on top of chain 2. -22 sts.
rnd 3. Slip Stitch with Grey yarn, Ch 3 counts as the first stitch, *2dc in the next st., dc in the next stitch, repeat from *around, join with sl st. -33 sts.
rnd 4. ch 3, dc in each back loop stitch around. join with sl st. -33 sts. Then continue on as directed in the video.
You can find this Bucket Hat in my Hats for Beginners Book. You can follow along from the video and choose the hook for the size you desire!
Free Crochet Unicorn Hat Pattern! This cute unicorn hat is perfect for your child! I made this for my daughter and she loved it! This free crochet unicorn hat pattern is awesome for your little one!
Abbreviations
hdc=half double crochet
sl st=slip stitch
sc=single crochet
ch=chain
2dctog=2 double crochet together
dc=double crochet
h hook
I'm switching to a WordPress blog instead of using this Blogger platform for various reasons, so this pattern has been relocated.
This star pattern is excellent for any occasion or for the tree as an ornament. I love how they look in any color of yarn. I used a h hook and medium worsted yarn. I uploaded a video if you need more help. This free crochet star pattern is easy to make and excellent for the holidays!
I'm switching to a WordPress blog instead of using this Blogger platform for various reasons, so this pattern has been relocated.
On hot summer days create a crochet cozy for your child's Popsicle. I used an I hook and medium worsted yarn. Do you love popsicles but hate the cold? Crochet your very own popsicle cozy! In this beginner's guide, we'll teach you how to crochet a popsicle cozy in just a few simple steps.
Popsicles are a summer classic, and this cozy will keep your icy treats cold and safe. With this crochet popsicle cozy, you'll never have to worry about frosty fingers again! Watch our video and learn how to crochet a popsicle cozy in just a few easy steps.
Create these Face Scrubbers with cotton yarn and I hook. These crochet scrubbers are wonderful to use daily to wash your face. I uploaded a video if you need more assistance! Do you hate cleaning your face with harsh scrubs? Wish you had a way to clean your face without all the scrubbing? Well, with this Crochet Face Scrubber Tutorial, you can make your own scrubs using yarn to clean your face easily and pleasantly!
Not only is this crochet scrubber super easy to make, but it's also stylish and perfect for everyday use. Whether you're looking for a homemade facial scrub to keep your skin smooth and clean, or just want to make something fun to keep your hands occupied while you're cleaning, this crochet scrubber is the perfect solution!
Abbreviations sc=single crochet sl st=slip stitch
I'm switching to a WordPress blog instead of using this Blogger platform for various reasons, so this pattern has been relocated.
This doily pattern can be done in any type of yarn or hook size. It measures 8 inches by 8 inches. It was done in cotton yarn and an I hook. It looks so pretty when finished and is great for any planter or table! This free crochet coaster pattern turned out so nicely! In this video, we'll show you the easiest way to crochet a doily in the simplest way possible. This simple doily is great for beginners who want to learn how to crochet, and it's perfect for using up scraps of yarn!
If you're looking for a quick and easy project to try your hand at crochet, this doily is the perfect thing for you! In just a few minutes, you'll have a beautiful doily that you can proudly display on your wall!
This holiday crochet star was made with medium worsted yarn and a G hook. It measures around 3 inches. You can make it bigger by going up a hook size or two. Supplies: Green and red yarn G hook Abbreviations: sc=single crochet ch=chain sl st=slip stitch dc=double crochet
I'm switching to a WordPress blog instead of using this Blogger platform for various reasons, so this pattern has been relocated.
In this video, we'll show you how to crochet a beautiful butterfly using simple and easy crochet instructions. This crochet butterfly tutorial is perfect for beginner crocheters, and will be a beautiful addition to your crochet projects!
If you're looking for a simple and easy crochet project that will be a beautiful addition to your crochet collection, watch this tutorial and learn how to crochet a beautiful butterfly! This crochet butterfly tutorial is perfect for beginner crocheters, and will be a beautiful addition to your crochet projects!
Create this crochet shell clutch purse for a night out! This is made with pretty medium-wasted yarn. It measures 5 inches by 7.5 inches when it's finished. You can adjust the size by changing the hook size.
H hook
Medium Worsted Yarn or Cotton yarn or you could use thread yarn to make a small one.
To Make this Smaller: Use a Smaller or Larger hook to make it larger.
Abbreviations
Chain=Ch
Slip Stitch=Sl st
Single Crochet=sc
Double Crochet=dc
Measures: 5 inches X 7.5 inches
I'm switching to a WordPress blog instead of using this Blogger platform for various reasons, so this pattern has been relocated.
Get ready for Christmas by decorating your tree with this Cute Angel Ornament! This is made with cotton thread yarn and a 2.7 hook size. You can make it bigger with thicker yarn or a larger hook size. It's perfect for any tree or to place on a gift. Enjoy this Angel Ornament Pattern that offers a Video Tutorial as well! We will be learning how to crochet an angel ornament. This project is perfect for beginners and can be completed in just a few hours.
If you're looking for a festive ornament to add to your Christmas tree, then this crochet angel ornament is perfect for you! This tutorial is easy to follow and will help you to create a beautiful angel ornament in no time at all.
Enjoy this Double Crochet Hat Pattern with Video to help you create a Crochet Beanie hat! This hat pattern is available in all sizes, from baby to adult. There is a step-by-step video if you need more assistance.
Supplies:
J hook, I made this for an Adult, or you can choose from all sizes above.


.png)